Aug 30, 2011

tuesday's theme {yellow}

i am absolutely gaga over the color yellow. it really can't make you anything less than happy.
earlier this year i joined in on a hue/texture project hosted by marta locklear that revolved around colors and textures. so much fun.
a couple week's ago, i noticed this on lindsay's little one love blog, and was totally inspired again to make yellow our theme for this time.
just think of the possibilities...even all the names for yellows are fabulous!
mustard, marigold, lemon, butter, ocher, banana, daffodil, maize, goldenrod, sunflower...
are you inspired!

so, go out and create some new imagery around {yellow}

here are one of the boards i put together for the hue/texture project and to give you some ideas...


Aug 29, 2011

good morning mondays {inspiraton}

stylized sessions. they're hot right now. so hot, you almost never see a session blogged without 'some' styling involved.  for some this is a breeze, for others, no clue of where on earth to begin.

the very first workshop i ever attended was amy wenzel's.  it was everything i thought it would be and more. amy was (is) a wonderful, giving, sharing human soul. one of the many reasons i was drawn to her photography was the fabulous sense of styling she showed in her sessions. everything from locations, wardrobe, even the smallest details, it's all important and she knew how to pull it all together.

so, for our good morning mondays {inspiration}, we thought we'd get you all a little extra excited about your next styled session and share a post directly from amy's blog called, 'tips for styling your shoot.'

thank you amy!
{and a little birdie told me you'll be seeing more of amy on our blog...soon!}

Tips for Styling Your Shoot

I’m fascinated with kid’s fashion.  I must admit it’s a huge source of inspiration for my photography.  I’m always excited to get the new Crew Cuts or Mini Boden catalog to see the adorable way they’ve photographed the kids in the clothes. Heaven help the day that I have my own children and constantly “dress them up” to take their picture.  Maybe they won’t like their mommy so much, ay, ay, ay.

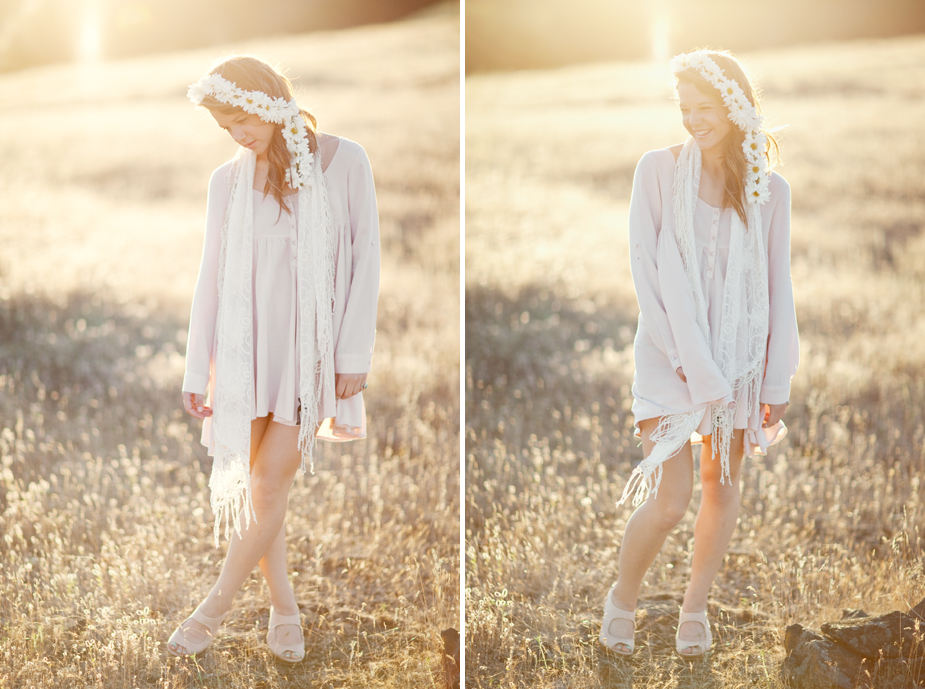
As a photographer, if you are working towards a commercial or editorial look, clothing choice can make or break an image.  Putting in the extra effort to help my clients select wardrobe helps me achieve the “Amy Wenzel” look and keeps me in love with what I do!  For those of you who would like to invest more creative vision into your shoots, I thought I’d share some of my thoughts on how to go about it.  I’ll start by sharing a few favorite images from a shoot that I styled in June. 


1. Start with a Vision
If you don’t know where you are going, how will you ever get there?  I approach each shoot with a distinct vision for the look and feel of the photographs.  In custom portrait work, you are not only the photographer but also the creative director, so I like to keep a running list of ideas and ‘dream shoots’ I hope to carry out someday.  When I book a new session, I see if the client is a good fit for any of my current ideas and then I suggest my concept to the parents.  Sometimes clients come with their own great ideas and that works too!   Usually I choose the location first, and then select clothing that will compliment and complete the vision.  The above session took place in the evening at this family’s farm, so I wanted the clothing to be soft and elegant with a touch of ‘country’ to it.

2. Offer to Style the Session
I don’t personally style every single shoot, but I always like to offer assistance with wardrobe to the parents.  My level of involvement is different with each client, but most of the time they take me up on my offer when I explain how strongly styling affects the final outcome of the photographs.  Help your clients become excited about what you are excited about and they will want to come on the creative journey with you.  Be sure to tell them how fashion inspires your work and that you’d like their session to reflect your personal artistic vision.  Remind them that the styling in your portfolio is part of what drew them to your images.

3. Go the Extra Mile
There are many approaches to styling a session.  Possibilities range from consulting with their current wardrobes to shopping with Mom online or in person.  I often send emails with links to clothing that inspires me, and I’ve even shopped for clients at the local children’s boutique and left clothes on hold for them to make selections.  Do whatever works for your business plan, but make your session fee is high enough to compensate for the added time and effort.  Remember that better photographs can also mean higher sales, so I personally believe in going the extra mile to make my photos as awesome as possible!!

4. Compliment Your Subject and Environment
When choosing wardrobe, I look for unique items with a great cut and fit.  I tend to choose fashion forward clothing rather than traditional styles.  I’m not afraid of using patterns and mixing colors, and I usually suggest an entire size down from what the parent typically buys.  This ensures the clothes fit snugly without the “growing room” for which parents usually allow.  I always keep in mind which colors look good for individual skin tones, and I also consider the colors in the setting so that the outfit will stand out against the back drop.  For instance, a green dress in a green field isn’t so compelling.  But a royal blue dress in a yellow field is dynamite!  Remember your complimentary colors (red & green, blue & orange, etc) to know what will look exciting in your composition!

5. Don’t Skimp on the Details
It’s amazing how simply adding a headband can complete the look and take it to the next level.  Never underestimate the power of a hairstyle, a pair of shoes, or a bangle bracelet.  Props should blend seamlessly with the vision and should enhance your image but never distract!  I bring along a couple of small props to each shoot.  I may or may not use them but I like to have options.  The little antique fishing pail featured in this session was a prop I’d been holding onto for awhile just waiting for the right opportunity to present itself.  Also remember that it never hurts to take a few risks, so I’m not afraid to suggest a change in hairstyle if I think it will compliment my client’s face structure or add interest to the look.  Great style is from head to toe, so don’t go to all the work to pick out a great look and then just throw on any old pair of shoes.  In this farm session I think her Hunter galoshes make the whole outfit!

6. Inspire Through Your Website
It’s a great rule of thumb not to display photography on your website that isn’t an accurate reflection of the type of work you’d like to do. For instance, if you don’t want to shoot families in matching white shirts, don’t put that type of work on your website.  If you can point your clients toward a dynamic portfolio filled with images in cute clothes, it’s much easier for them to lay hold of your vision and select an appropriate outfit.  If necessary, do a few free shoots for friends where you style the kids yourself to build your portfolio.  It will be well worth the investment even if you have to pay for the clothing yourself!  Your website is your selling tool and should attract the right type of client for you!

I hope these tips are helpful for both parents and photographers as you approach an upcoming session.  Thanks for reading!

website:     http://www.amywenzel.com/
facebook:  http://www.facebook.com/amywenzelphotography
twitter:      http://www.twitter.com/amy_wenzel
swiss miss design haus:   http://www.swissmissdesignhaus.com


Aug 24, 2011

wednesday's {eye candy session}

I have 'always' loved Amanda's work.   From her amazing seniors to breathtaking weddings she is, and always will be, a huge inspiration to me.   Here at Lemonade and Lenses we like to showcase every type of photography, not just something specific, and since I am a senior photographer I thought it was time to show an 'awesome' senior eye candy session.  So ladies and gentleman get ready to be inspired.

Name: Amanda

Business name:  Amanda K Photography

Website :   amandakphotoart.com

What Camera and lens was the session taken with:  Canon 5D MarkII, 35mm 1.4L, 85mm 1.2L, 45mm T/S 

Stylist : Styled by Danielle of SIMPLE MARIE

If you have a session that you would like to feature, as eye candy, on our blog please send an example to info@lexivornberg.com.  We love to showcase our readers work.

Aug 18, 2011

{Featured Photographer}

We have an awesome post today that actually ties in with this Tuesdays 'selfie' theme! Today's guest blogger is an amazing, inspirational artist who really takes self portraits to a whole new level.  She was kind enough to take some time to put together seven tips/steps to helping you with your self portraits and to give you a little push to be more creative.  Who may this amazing artist be you ask??  Well it can't be anyone else but the talented Alex Beadon!!
Hi everyone! I am so thrilled to be guest posting here on the Lemonade and Lenses blog! Today I am going to be discussing self portraiture which, as of January of this year, has been my new-found photography crush. It has helped me grow so much as an artist by showing me what it feels like to be in front of the camera, and by teaching me that you need to rely less on your subject and more on your creativity to make an image stand out.  Here are my top seven steps to creating beautiful self portraits. I really hope you guys find this helpful!
1) Make sure you have the right equipment!
You will want to have the following:
1) A camera with a self timer option, 2) A tripod to hold your camera at the right angles and heights, 3) A remote control so that you don't have to continually run back and forth between you and your camera.
I use a Canon 5d mark ii, a Velbon tripod and a Canon RC-1 remote control.
These three things will make your life so much easier.
2) Find a focusing system that works for you.
I place an object in front of the camera in the exact spot where I will be standing or sitting. That way I know that I will be in focus and I won't have to waste too much time with focusing issues.
3) Know your concept before you set up.
What kind of image are you going for? A natural self portrait? A conceptual self portrait? A moody self portrait? Find inspiration in the world around you - base your self portrait on the last movie you watched, one of your favourite songs, an event that's going on in your life. Or set yourself a challenge to create a self portrait that represents a certain word - love, envy, nature, and so on. Let your mind run free and try to push yourself to create something absolutely incredible. Everything matters - clothes, make up, hair, location etc.. - so make sure it all comes together with your concept, no matter how simple or complicated it is.
4) Think about the set up and perfect it before you start shooting.
As mentioned earlier, I always put an object in my place so that I can focus on it properly and know where I'll be in relation to everything else in the picture. I think about the lighting, the composition, the camera settings. When I have everything perfect in camera, I turn on the camera's self-timer option, get into position, and click away with my remote. I take about 10-20 photos, moving just a little bit for each photo so that I can pick my favourite afterwards. Then I run to the camera to check that I am in focus etc.. Then I go back to the position and try a bit of a different pose/look, take 10-20 photos and then run back to the camera to check that I'm in focus... and so on.
5) It's okay to mess up.
I've been doing self portraits since January of this year, and to this day I still get the focus off in every self portrait shoot I do - it's impossible to get it perfect 100% of the time when you can't be behind the camera and in front of the camera at the same time. I found that using an object as a focus point has been very helpful in speeding up the process to perfect focus, but I still get it wrong from time to time and as frustrating as it can be, I've come to learn that it's okay to mess up. Practice makes perfect, and sometimes the blurry ones look pretty cool blurry and can be a happy mistake :).
6) Once you have the "safe" shot, try something different.
You're on location, you're there with your tripod, camera and remote (and focusing object), you might as well take a few more - right? Look around you in search for the perfect light. Having amazing light and a bad location beats having bad light and an amazing location every single time - hands down. So - look for the light. Then see how you can incorporate yourself into that location with the amazing light in an interesting and unique way.
7) Be Original!
Think outside of the box. Erase all of your preconceived notions of self portraiture, and create something for you. Forget what everyone else will think or say. All that matters is that you are creating something that your eyes and mind will enjoy looking at and find visually interesting. Don't pressure yourself, just create.
And there you have it - seven steps to creating beautiful self portraits! Now it's up to you to rock it out! :) Good luck!


Thank you again Alex for taking the time to put this together.   I think it's exactly what we needed to get inspired to go out and try a self portrait!!  What do you guys think??

Aug 16, 2011

tuesday's theme {selfie}

oh yes, you read it right and oh yes, you...can...do it!

but first, lexi and i want to thank everyone who shared their lovely images for the {love} theme. from little girls and puppy dogs to lovely entwined vines on a tree. it's all about the interpretations. it's part of the magic of each and every one of us and what makes this project sing.

now, on to the next theme...push yourself, use your imagination, step way out, be daring, be soulful, be sassy, be sweet, be someone else if you like...just come and play and make a self portrait.
need some inspiration? remember this post from a couple weeks ago? a starting point if you're already wondering where to begin. 16 great images for inspiration.
need more? this is the perfect time to introduce alex beadon of alex beadon photography as you will see her shortly as a guest on our blog. her topic...you guessed, self portraits. she is in the process of her own 30 day self portrait project now. you can see her beautiful, expressive, artistic work here.

a quick note: we've had a few inquires asking if the images should be new or can they be pulled from past work. yes, the images should be new, shot after the theme is posted as this is an exercise in growing and pushing yourself to make new art around your vision only. if you happen to find that image on a session, fine. if you need to go out on your own to create it, great. just make it a new one.

ok. i'll go first. the light was beautiful late this afternoon, so i thought i'd twirl in a dress i picked up from the flea market and maybe even dream a little in that beautiful light....


tripod, remote, 5 minutes shooting, 5 minutes processing.
now it's your turn...

xo
gigi and lexi


Aug 8, 2011

our first gathering


i was so hoping to have this post up right after our gathering, but...better a little tiny bit late than never.

let me start out by saying thank you to lexi, again, for coming up with the idea of
'just getting some photographers together for a fun evening.'
who would have thought all this from that?
but, as we know, most wonderful things start with a quiet, little thought.

next, lexi and i both want to thank everyone who came out, joined in, shared, laughed, chased spiders, sat side by side and even got up for the photo booth (yes, i already wrote that on our fb wall, but i still mean it and it makes me smile;)
lemonade and lenses would not be possible without each and every one of you coming together as a community. thank you for bringing your smiles, friendship, knowledge and most especially, your sweet selves. an extra hug to those of you who drove in from far, far away...
all we can say is WOW!

i'm going to post a few shots even though many of you did a fabulous job of that already. if you'd like to see what i'm talking about, you can go hereherehere, here and here.  (if i have missed anyone, PLEASE let me know!)
thank you all for capturing the evening so beautifully! an extra special thank you to renee of ribbons of red for the cutest little burlap bags filled with goodness and the even sweeter little buttons! and, did all of you notice how beautiful the floral centerpieces were?
that was all angel of angel pope photography...who says you don't have a green thumb? xo.
i didn't have a lot of time to pick my camera up (and lexi's was in the shop) but when i did, this is what i saw...


 and now for photo booth fun!


 next time...
EVERYONE GETS IN FRONT OF THE PHOTO BOOTH!


Aug 2, 2011

tuesday's theme {stripes}

yay! here' are the images for tuesdays first theme project!
thank you to everyone who played along and hopefully this will inspire others to jump in too!
we love lots and lots of company!


{stripes}


1, 2, 3, 4, 5 (heather), 6, 7, 8


a little note...and some changes

as much as i love putting boards together...i can foresee this being a bigger and bigger task as more and more peeps join in.
so, i'm going to change the way images are submitted and showed that i think will be easier all the way around. i hope this is alright with everyone!

i want to create an album on the l&l facebook page for each themed week and have all the images in there, in one place and easy to check out.
in order to do that i would love to ask all of you to do this... (pretty please):

• email your images to me (gina) at gina@kiwistreetstudios.com NO LATER than the second sunday following the announcement of the new theme. be sure to add my email to your contact list too;)

• the images need to be submitted in the following format - .jpg format, 72dpi, the longest side no larger than 720 px wide.

• i will post the images in the themed album as soon as i can upon i receiving them. absolutely tag yourselves when you see them!

• please feel free to watermark your images...but, try to watermark them in such a way that it doesn't hide the image;)

•please please feel free and i actually encourage everyone to leave your comments on each others images. i know we are all sooo busy, but if an image really speaks to you, let that artist know!


the last thing i'd like to say is that this is meant for fun, stretching and growing no matter where on your own personal journey you happen to be. your interpretation,  your vision and your art.


ok...the new tuesday theme is {love}


xo
gigi


Aug 1, 2011

good morning mondays {inspiration}

one   two   three   four   five  six  eight  nine  ten  
(seven in unknown)